COPIED from http://www.simple-knitting.com
Pretty, Textured Basketweave Stitch
Easy to Knit and Great Practice for Beginning Knitters
I love knitting the basketweave stitch. Remember on my homepage when I said that a lot of times knitting looks complicated? Well this stitch pattern looks complicated. The great thing is, it is easy to do.
If you know how to knit and how to purl you can knit this pretty stitch pattern too.
This stitch pattern is a simple combination of knits and purls and it creates a really pretty textured fabric. You can use it for anything you want really. I have seen really nice sweaters, hats, afghans, pillows and scarves.
And like so many stitch patterns the basketweave stitch has lots of pattern variations. The first stitch pattern is the one I grew up with and it is my favorite. The others are variations from it that you can try as well.
They are all simple to do so have fun with them.
BASKETWEAVE
This one is so fun to watch as the pattern slowly starts to come alive.
I have heard that this stitch pattern is also called checkerboard. To me though it really does look like basket weaving. Wait until you see it on a big knitting swatch.
It's just so pretty.
Pattern
Work multiple of 8 stitches and 5 extra stitch
Row 1 and 5 (Right side): Knit all stitches
Row 2 and 4: Knit 5, *purl 3, knit 5; repeat from * to the end of the row
Row Three (3): Purl 5, *Knit 3, purl 5; repeat from * to the end row.
Row 6 and 8: Knit 1, Purl 3, *Knit 5, purl 3; repeat from * to the last stitch Knit 1.
Row 7: Purl 1, Knit 3, * Purl 5, Knit 3; repeat from * to the last stitch Knit 1.
Repeat all the rows 1 - 8 to make the basketweave stitch pattern
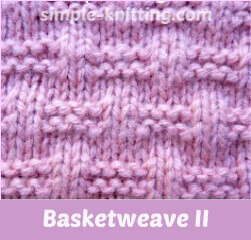
BASKETWEAVE II
This basketweave stitch pattern is also called the basket stitch.
To me this one doesn't have as much pattern definition but it is still pretty. You just have to have a look on a bigger swatch to really know if you like it.
Pattern
Work on a multiple of 6 + 2 sts, + 1 edge stitch on each side
Rows 1 (right side of work), 3, 5, 7, 9 and 11 rows: KNIT all stitches
Rows 2 and 8: PURL all stitches
Rows 4 and 6: Knit 1 (edge stitch) Purl 2, *Knit 4, Purl 2*; repeat from * to * to last stitch, Knit 1 (edge)
Rows 10 and 12: Knit 1 (edge), Knit 2, *Knit 1, Purl 2, Knit 3*; repeat from * to * to last stitch, Knit 1 (edge).
These last 12 rows form patterns
Rows 2 and 8: PURL all stitches
Rows 4 and 6: Knit 1 (edge stitch) Purl 2, *Knit 4, Purl 2*; repeat from * to * to last stitch, Knit 1 (edge)
Rows 10 and 12: Knit 1 (edge), Knit 2, *Knit 1, Purl 2, Knit 3*; repeat from * to * to last stitch, Knit 1 (edge).
These last 12 rows form patterns
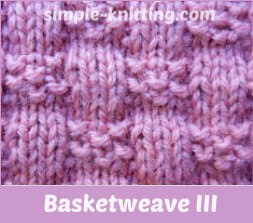
BASKETWEAVE III
This is a really pretty basketweave stitch. It has a bit of seed stitch mixed in.
I can visualize a lot of pretty things with this stitch pattern, it's just lovely. I am thinking of using it for a blanket or a small lap blanket.
Hmmm I am still thinking on this one. I fell in love it.
Pattern
Work on a multiple of 8 + 3 sts, + 1 edge st on each side.
Rows 1 (right side of work) and 7: KNIT
Rows 2 and 8: PURL all sts.
Rows 3 and 5: Knit 1 (edge), *Knit 3, Purl 2, Knit 1, Purl 2*; repeat from * to * to last 4 sts, Knit 3, then Knit 1 (edge)
Rows 4 and 6: Knit 1 (edge) Purl 3, *Knit 1, Purl 1, Knit 1, Purl 1, Knit 1, P3*; repeat from * to * to last st, Knit 1 (edge)
Rows 9 and 11: Knit 1 (edge) *Purl 1, Knit 1, Purl 2, K3, Purl 1* repeat from * to * to last 4 sts, Purl 1, Knit 1, Purl 1, then Knit 1 (edge).
Rows10 and 12: Knit 1 (edge stitch), Purl 1, Knit 1, Purl 1, *K1, Purl 3, K1, Purl 1, Knit 1, Purl 1* repeat from * to * to last st, Knit 1 (edge).
These last 12 rows form pattern.
I hope you have fun knitting these stitch patterns. It's so neat to watch the pattern grow.
Choose one that you really like and use it in your next knitting project.


No comments:
Post a Comment