How to make abaya – farasha
How to make abaya – farasha
May 21, 2011 //
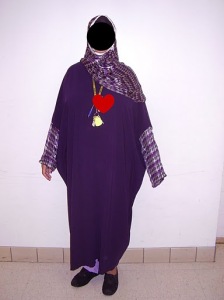 Objective: A closed farasha abaya.
Supplies:
1. fabric (we will go over the amount later). I recommend silk, linen, rayon/viscose, cotton, bamboo, or wool in some climates. Synthetic fabrics are available but not breathable.
2. thread. I recommend Gutermann or Mettler, but any good brand of thread will be fine.
3. hand or machine needles appropriate to the fabric you are using.
4. ruler (preferably a long one)
5. method of marking the cloth. Some use a soap sliver, some a washable marker, some a tailor’s chalk. Just make sure to test it on a scrap first.
6.scissors for cutting fabric.
7. bias tape for neckline and sleeve openings(optional).
8. sewing machine or serger (optional, remember that abayas were traditionally sewn by hand).
Procedure:
1. Measure yourself or have a friend measure you. You need the following measurements: nape of neck to floor (A), around the body at widest part (add 10″ or 40 cm, then divide this by two for B), and wristbone to wristbone across the back and shoulders (C). Please remember that the widest part could be chest, hips, stomach, upper thighs, whatever.
Example: A sister is 44″ around at her widest part. She adds 10″ to this to get 54″, which allows for a loose and modest garment. She divides this by 2 and arrives at 27″ for B.
2. Purchase fabric. You need twice A (A is getting you from the shoulder to the floor, but you need both a front and a back). Make sure the fabric you choose is wide enough for C or be prepared to use sleeves.
2. Wash and dry the fabric in the same way that you plan to treat the finished garment.
3. Cut the fabric according to the following diagram:
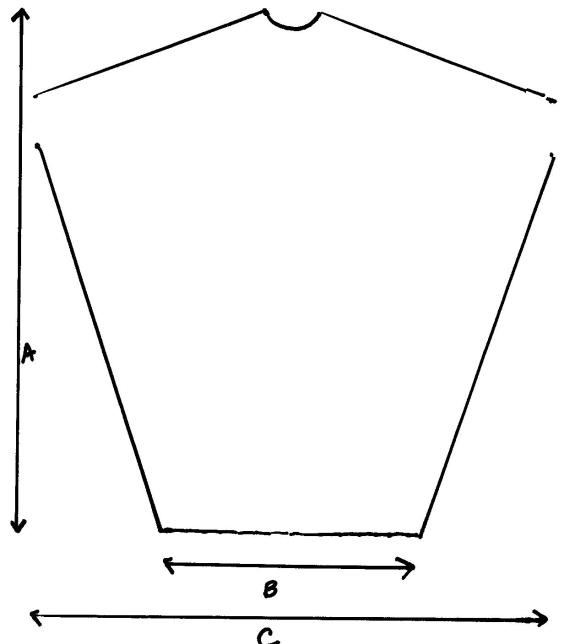 Note that there is a slant in the shoulders in the picture. The top of the wrist opening should be 11″ or 28 cm down from the shoulder if C is 152 cm or 60″ – if your C is shorter, adjust accordingly. The wrist openings should measure about 15 cm or 6″. Mark the bottom of the sleeve opening (I use a short snip into the fabric but it’s your choice). In the sample I made, there was not enough fabric to make the garment floor-length, so I am wearing pants underneath.
4. I suggest that you use the neck opening from a well-fitting garment as a guide for how to cut the neck. Remember that if it is too small initially, you can enlarge it, but there is no way to shrink a too-large neckline.
5. All sewing is done right sides together. Sew one shoulder seam.
6. Finish neckline with bias binding or some other method. I finish it with a serger since the shayla covers the neckline.
7. Sew the other shoulder seam.
8. finish sleeve openings with bias binding or some other method. If you are going to use attached sleeves, skip this step.
9. sew up side seams to markings for sleeve openings (do not sew sleeves closed!).
10. If you are attaching sleeves, make tubes of an appropriate length and width, hem them appropriately or double them so no hem is needed, and sew to openings. You will notice that in the sample garment I made, the chiffon sleeves can be worn rolled up or down.
11. try on garment and hem.
Make your own abaya! part1
Make your own abaya! part1
12022009
As the muttawa have been confiscating abayas with colour in Riyad, I would like to support my friends over there by posting some very simple abaya designs. Any idiot can make these
Besides, I’m getting a lot of search-engine terms on ”how to make abaya” and I don’t want to disappoint. For those visitors; don’t look too much at my other posts, you might be shocked…
So, three dead-easy abaya designs, very suitable for your own decorations, which will be in the next part. When everybody is happy and confident (and feeling like wanting to wear something more fitnah-ish) we can try the more complicated design of the fitted abaya. That is the one I use for my wintercoats.
Materials:
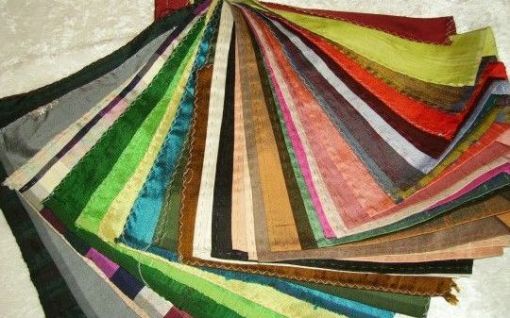
One big advantage of making your own clothes is that you can use better and more healthy materials as the synthetic ones so often used for abayas nowadays. If your surroundings are not very hot, you can get away with a good cotton, or even better, a nice linen. Linen is ideal, it can retain far more moisture as cotton, therefore it will be feeling cool. In a really hot environment a light silk would be the best choice. Silk is usually very expensive, but that is a market mechanism. To buy in bulk, a decent silk doesn’t cost much more as a good cotton. So do shop around! Because of it’s luxury reputation, the shops put a much larger margin on it, making it more expensive. It might also be a good idea to buy a cheaper undyed material, and dye it in the color of your choice. With delicate materials it is best to try a small piece first. Dupioni silk is usually fairly cheap, but it looks a bit stiff. I do like the rough texture though, and you can get it in all sorts of colors, and in pretty changeant weaves too.
Fastenings:
You can use snaps, hooks, zippers, buttons or velcro, it is your own choice. Velcro may sound easy, but has spelled doom for many a pretty delicate shayla. I think the easiest option is buttons, and, instead of making the quite complicated buttonholes, make a loop, use a bit of nice ribbon, or cord. If you use a different color it will be a decorative feature.
Measurements of the patterns:
I can’t give exact measurements on these designs, you have to find out your own measurements. The measurements you need are in the drawing underneath. Instead of experimenting on some beautiful material, I suggest you buy some very cheap cloth, like an unbleached cotton, and stitch it loosely, or even just pin it together, try it on and make changes as you like. Once your try-out is to your liking, you unpin or pick out the stitching, and you can then use the pieces of material for your own perfectly fitting pattern.
If your pattern is precisely cut on your finished dress/abaya, make sure you allow an extra 1,5 cm for stitching and edging the material. I would not line an abaya, because you use it over your clothes in mostly hot countries, so to add even extra material would be even more suffocating. If you add a lining for effect you could choose to only line the bottom of your abaya or sleeves.
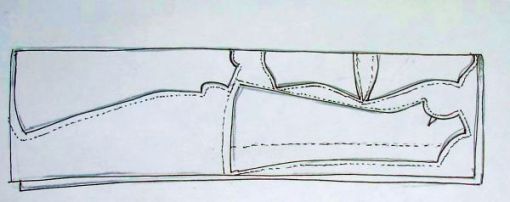
Above you see an example on how you could lay out the pattern on your material. lay out your pieces, and move them around until you have them placed as economically as possible. Note down how much material you need, handy to know, especially if you plan on buying an expensive material next time. Most cloth comes at a width of 1.50 meter. Some more exclusive materials are only 1,20 wide. In that case you can’t slip in the sleeves at the sides, and you need 2× your length, #5. And 1× your sleeve length, #2.
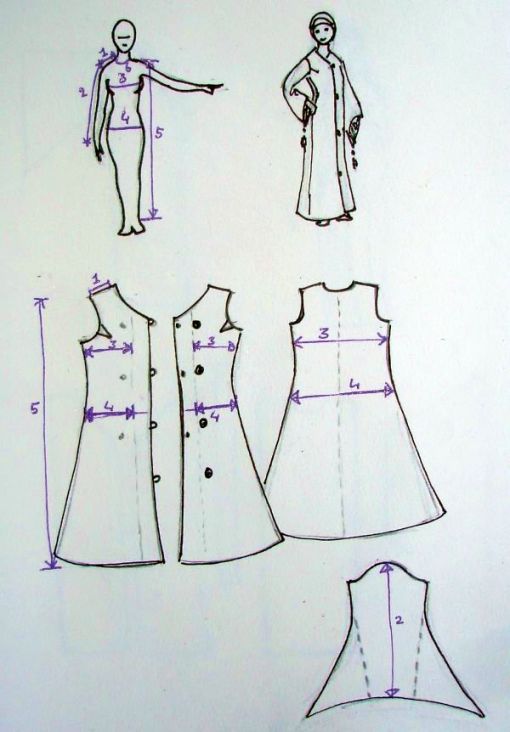
These are the measurements you need, work them out for yourself, and make a trial-abaya which you can unpick, or cut up, and use as your personal pattern. Draw the pattern on your real material with special tailor chalk. The sleeve on pattern #1 is a wide sleeve, but if you draw the line to the seam you get a fitted sleeve. This also shows how you can make variations, once you have a good pattern. I only use basic patterns myself, and chance them when drawing them with chalk on the material for the design of a specific garment I’m making.
Pattern #1 and #2 have an overlapping front. You can easily adapt #1 so it won’t overlap. If you use an overlapping front, you nee to put in at least two extra buttons or snaps on the inside, to keep the bottom layer of cloth from sagging down. On pattern #1 you can see three light doth which are sugestions for the inside buttons or snaps.
This second pattern is really a Japanese kimono. This is a véry simple pattern and should be well in reach of everybody who would like to try and make something. Simple forms are also a nice canvas for your own decorations.
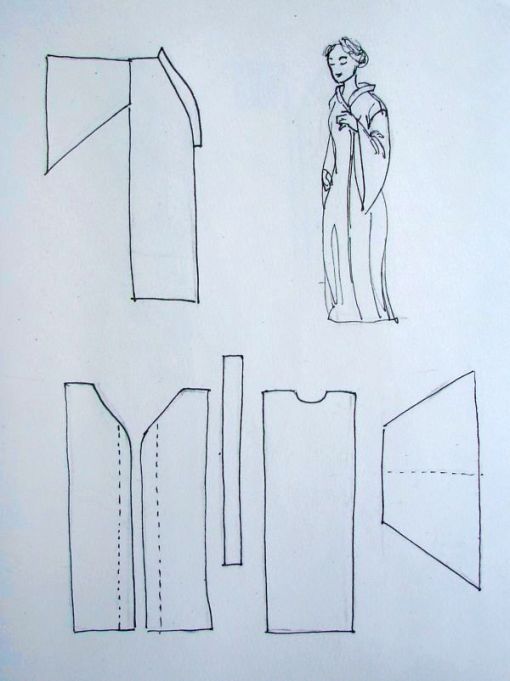
With the kimono pattern, you don’t have to be careful with the shoulder seam, it’s supposed to slip from the shoulder a bit. You can make a much wider kimono, by cutting the front and back-panels for a much wider shoulder, and then create three folds which you stitch for about 25cm.
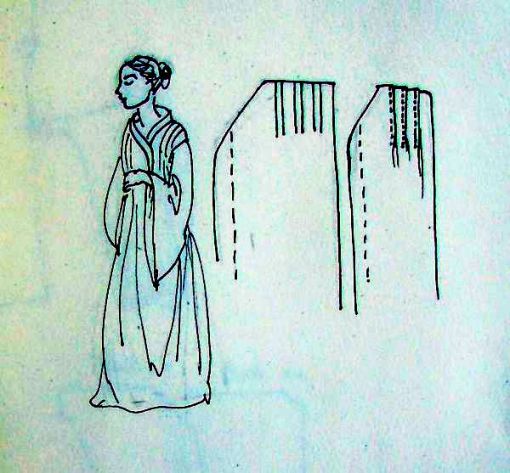
Pattern #3 is a very simple basic traditional butterfly design. Not handy in daily life, but very pretty. You can decorate the sleeve cuffs, or even make them of a different material. Like a Chinese brocade.
Once you have tried making one of these, experiment with different cuts, or try your hand at adding some nice decorations. In part 2 I will give some ideas for decorating your abaya. (or anything else)
Besides, I’m getting a lot of search-engine terms on ”how to make abaya” and I don’t want to disappoint. For those visitors; don’t look too much at my other posts, you might be shocked…
So, three dead-easy abaya designs, very suitable for your own decorations, which will be in the next part. When everybody is happy and confident (and feeling like wanting to wear something more fitnah-ish) we can try the more complicated design of the fitted abaya. That is the one I use for my wintercoats.
Materials:
One big advantage of making your own clothes is that you can use better and more healthy materials as the synthetic ones so often used for abayas nowadays. If your surroundings are not very hot, you can get away with a good cotton, or even better, a nice linen. Linen is ideal, it can retain far more moisture as cotton, therefore it will be feeling cool. In a really hot environment a light silk would be the best choice. Silk is usually very expensive, but that is a market mechanism. To buy in bulk, a decent silk doesn’t cost much more as a good cotton. So do shop around! Because of it’s luxury reputation, the shops put a much larger margin on it, making it more expensive. It might also be a good idea to buy a cheaper undyed material, and dye it in the color of your choice. With delicate materials it is best to try a small piece first. Dupioni silk is usually fairly cheap, but it looks a bit stiff. I do like the rough texture though, and you can get it in all sorts of colors, and in pretty changeant weaves too.

Fastenings:
You can use snaps, hooks, zippers, buttons or velcro, it is your own choice. Velcro may sound easy, but has spelled doom for many a pretty delicate shayla. I think the easiest option is buttons, and, instead of making the quite complicated buttonholes, make a loop, use a bit of nice ribbon, or cord. If you use a different color it will be a decorative feature.
Measurements of the patterns:
I can’t give exact measurements on these designs, you have to find out your own measurements. The measurements you need are in the drawing underneath. Instead of experimenting on some beautiful material, I suggest you buy some very cheap cloth, like an unbleached cotton, and stitch it loosely, or even just pin it together, try it on and make changes as you like. Once your try-out is to your liking, you unpin or pick out the stitching, and you can then use the pieces of material for your own perfectly fitting pattern.
If your pattern is precisely cut on your finished dress/abaya, make sure you allow an extra 1,5 cm for stitching and edging the material. I would not line an abaya, because you use it over your clothes in mostly hot countries, so to add even extra material would be even more suffocating. If you add a lining for effect you could choose to only line the bottom of your abaya or sleeves.

Above you see an example on how you could lay out the pattern on your material. lay out your pieces, and move them around until you have them placed as economically as possible. Note down how much material you need, handy to know, especially if you plan on buying an expensive material next time. Most cloth comes at a width of 1.50 meter. Some more exclusive materials are only 1,20 wide. In that case you can’t slip in the sleeves at the sides, and you need 2× your length, #5. And 1× your sleeve length, #2.

These are the measurements you need, work them out for yourself, and make a trial-abaya which you can unpick, or cut up, and use as your personal pattern. Draw the pattern on your real material with special tailor chalk. The sleeve on pattern #1 is a wide sleeve, but if you draw the line to the seam you get a fitted sleeve. This also shows how you can make variations, once you have a good pattern. I only use basic patterns myself, and chance them when drawing them with chalk on the material for the design of a specific garment I’m making.
Pattern #1 and #2 have an overlapping front. You can easily adapt #1 so it won’t overlap. If you use an overlapping front, you nee to put in at least two extra buttons or snaps on the inside, to keep the bottom layer of cloth from sagging down. On pattern #1 you can see three light doth which are sugestions for the inside buttons or snaps.
This second pattern is really a Japanese kimono. This is a véry simple pattern and should be well in reach of everybody who would like to try and make something. Simple forms are also a nice canvas for your own decorations.

With the kimono pattern, you don’t have to be careful with the shoulder seam, it’s supposed to slip from the shoulder a bit. You can make a much wider kimono, by cutting the front and back-panels for a much wider shoulder, and then create three folds which you stitch for about 25cm.

Pattern #3 is a very simple basic traditional butterfly design. Not handy in daily life, but very pretty. You can decorate the sleeve cuffs, or even make them of a different material. Like a Chinese brocade.
Once you have tried making one of these, experiment with different cuts, or try your hand at adding some nice decorations. In part 2 I will give some ideas for decorating your abaya. (or anything else)

ISLAMIC SEWING – Butterfly / Shoulder Abaya
ISLAMIC SEWING – Butterfly / Shoulder Abaya
Make one at home  Butterfly/Shoulder Abaya
How many of our sisters living in the West has tried to find an everyday Abaya something comfortable and affordable.
yes we can buy from the store if we are lucky enough to have one within reach or our other option is to purchase online… all very well if you want something extra special but for everyday wear they are usually quite expensive and not usually in the styles or colours i really like , and very rarely do they fit properly i nearly always end up making alterations sooo……..
why not make your own.
I know many sisters enjoy enjoy sewing and by doing so we have the added benefits of saving money , having something that fits well and that you can embellish easily yourself making it an original creation if you so wish.
I also like the idea of being able to make my own from my own choice of fabricand in my favourite colour… what about a hijab and or niqab to match . EASY when you know how.
Butterfly / Shoulder Abaya


Butterfly/shoulder style Abaya

instructions
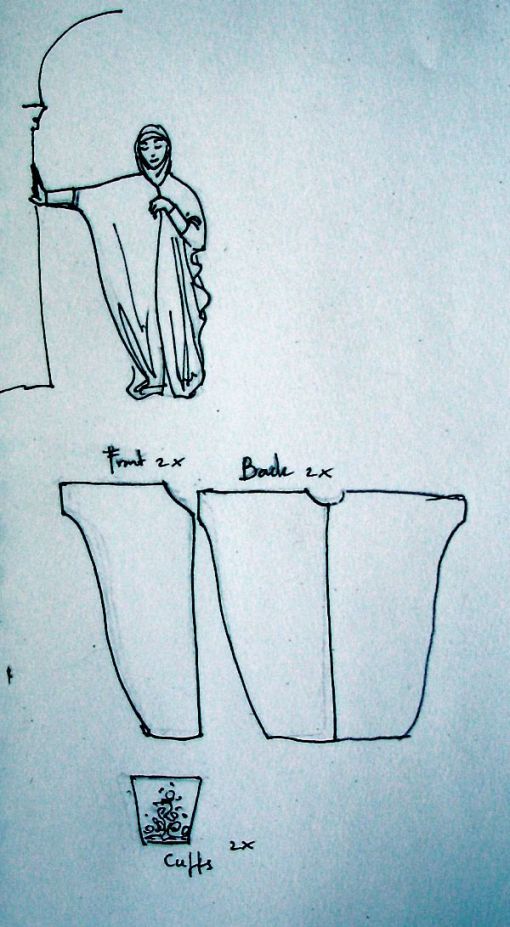
• With arms at the sides, have someone measure from one wrist to the other going across the back of the shoulders.
• Purchase twice this amount of 60″ inch wide fabric.
• Fold the left and right edges so that they meet in the center.
• Pin in several places to hold the fabric in place.
• Referring to the diagram: Cut a V-neck in the top layer of fabric.
• Stitch the seam line across the top.
• At the upper left and right corners, cut openings for your hands.
• The center seam of the abayah may be closed in several ways:
1. The easiest thing to do is simply stitch the entire seam all the way up to the neck.
2. You could also stitch from the bottom, half-way up, then insert a long zipper, or even several snaps or velcro.
• Cut the bottom of the abayah, large and round.
• Finish the neck opening, and cuffs with satin ribbon or bias binding.
• Hem the bottom.
Using an overlocker on all the seams gives a very professional finish.
don’t forget to leave an overlap of approximately 1 inch on each edge of center front seam if an open Abaya is required this is necessary for attaching buttons and button holes, zips or snap fasteners.
If a closed front Abaya is required then an overlap of approximately 1/2 is sufficient for the seam allowance necessary.
sequins,lace, beads, embroidery , ribbon or any other decoration can be added to the neckline, cuffs and about 4 ins from the hem.
If an open fronted Abaya is made decoration can carry down both sides of the front panel… where ever you wish.
It is entirely up to the individual in the choice of material, i particularly like the drape of crepe or silk.
Cotton is very durable… really anything that will fall and drape nicely is suitable.
Have fun sisters inshallah
please leave any comments as i would love to know how it worked out for you.. For the Arabic translation you can also contact me via my facebook … sisters only please.. 
http://www.facebook.com/fatma.muslima
http://www.facebook.com/fatma.muslima
No comments:
Post a Comment