The Sleeve Details
The Sleeve Details
I’m a huge fan of piping and was heavily influenced by those ads Cynthia Guffey did for the sewing machine companies back in the 80s. Not only were the dresses impeccably sewn with matching piping at the neckline and armholes but then they would have this awesome embroidery running down the side or at the hemline. Does anyone remember those ads, besides me?
So I’ve been adding piping to garments for years trying to perfect that look…and now twenty years later I have my own method (culled from reading books, taking classes and by trial and error) for inserting the piping into sleeve hems. This isn’t the only way that I do this process but this is the simpler application and let me add the disclaimer here…I’m sure that there are more professional, correct, by the book ways of inserting the piping. This is just how I do it. Sherry, who authors the blog, “Pattern…Cloth…Scissors” just posted a tutorial on how to make piping from beginning to end and add it to a waistline seam. I would definitely check out her tutorial!
Okay now that we’ve gotten that out of the way, first after cutting the pattern out, I cut 1.5″ off the sleeve hem and set the strip to the side.


I will admit that after all the hand stitching I did in the dress that I got lazy at the end. If I were a “couture” sewist, I would have gone the extra mile and encased the piping. But last Sunday I wasn’t…and since I sealed the cut piping ends and stabilized the seam, I’m not worried about the piping fraying. Now, I’m not recommending that you follow me off the cliff, I’m just showing you what I did in this garment.
As a follow-up, I’ve finished the lined flare skirt from the Ten Yard Adventure Wardrobe and I’ve cut out a wide legged pair of pants too. I know they need some type of lining because they are a little see-through, I just don’t want to lose the drapiness of the fabric, so I’m working this through in my head.
…as always, more later!
So I’ve been adding piping to garments for years trying to perfect that look…and now twenty years later I have my own method (culled from reading books, taking classes and by trial and error) for inserting the piping into sleeve hems. This isn’t the only way that I do this process but this is the simpler application and let me add the disclaimer here…I’m sure that there are more professional, correct, by the book ways of inserting the piping. This is just how I do it. Sherry, who authors the blog, “Pattern…Cloth…Scissors” just posted a tutorial on how to make piping from beginning to end and add it to a waistline seam. I would definitely check out her tutorial!
Okay now that we’ve gotten that out of the way, first after cutting the pattern out, I cut 1.5″ off the sleeve hem and set the strip to the side.

Then I hand stitch the piping 5/8″ onto the edge of the sleeve
leaving about a 1/2″ of piping on either side.

The strip that was cut off was serged on both sides.
Next the strip was pinned to the sleeve’s hem covering the piping.

Sewing the piped edge down using my zipper foot.

I use my bamboo point turner to mark a seam line as close
as possible to the piping so I’m sewing right up next to the piping.

Right side of piping inserted in the sleeve’s hemline

Wrong side of piping inserted into the sleeve’s hemline
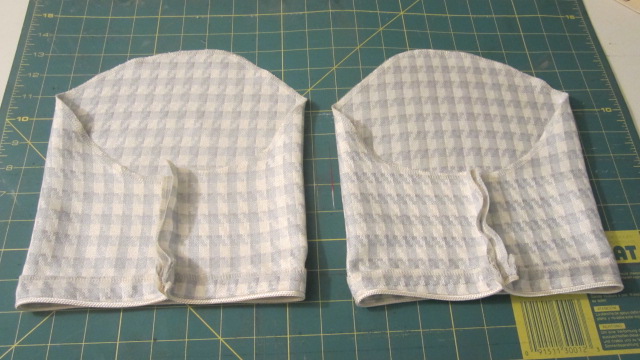
The sleeves with the underarm seams sewn but not yet pressed open.

The underarm seam is pressed flat. The extra piping cut off and
finished with a seam sealant (Fray Check) and then
stitch witchery is placed under the seam and pressed.

The finished sleeve in the dress after a line
of stitching has been added close to the piping.
Again, this is one of the ways that I apply piping to sleeve hems. The other method involves applying the piping in the sleeve hem with the underarm seam sewn so that the piping is encased in the hem and the process can be found in this post.I will admit that after all the hand stitching I did in the dress that I got lazy at the end. If I were a “couture” sewist, I would have gone the extra mile and encased the piping. But last Sunday I wasn’t…and since I sealed the cut piping ends and stabilized the seam, I’m not worried about the piping fraying. Now, I’m not recommending that you follow me off the cliff, I’m just showing you what I did in this garment.
As a follow-up, I’ve finished the lined flare skirt from the Ten Yard Adventure Wardrobe and I’ve cut out a wide legged pair of pants too. I know they need some type of lining because they are a little see-through, I just don’t want to lose the drapiness of the fabric, so I’m working this through in my head.
…as always, more later!
Sewing Tutorial | Getting Flat Bias Necklines
Sewing Tutorial | Getting Flat Bias Necklines
Posted on February 15, 2012 by jen | grainline

I often get questions asking how I get my bias faced necklines to lay flat, so I’m here today with a tutorial to help you do just that. It can be really frustrating to make a garment that looks so good only to have the neckline not lay right against the curves of the body, in fact, I’m pretty sure that was a telltale sign that I had made the garment I was wearing back in the day. So first off, if you’re wondering what a bias faced neckline is, it’s where the neckline if finished with a strip of bias fabric that is turned to the inside and stitched in place. It’s how I finished the necklines of both the Tiny Pocket Tank and the Scout Woven Tee. It’s really very easy, just a few extra steps and some pressing that are well worth it in the end. As usual with tutorials this is an image heavy post, so click the link below to view the entire tutorial.
▲ A quick note. This tutorial uses a 1″ wide bias piece with 1/4″ seam allowances to create a finished bias facing of 1/4″.
Step 01 | Preparing Your Garment
Sew and finish the side and shoulder seams and any other seams that will intersect the neckline.

Step 02 | Making Your Bias Band
Most patterns will include a pattern piece for the bias strip you will need to finish your neckline. If so, cut this out of your desired fabric and join at the center back. If you don’t have a pattern piece for whatever reason or you want to use ready made bias tape measure your neckline at the seam line and cut a bias piece about 1/8″ shorter than your measurement.

Step 03 | Attaching the Bias Band


Step 04| Clipping and Grading

Step 05 | Understitching


Step 06 | Finishing the Neckline
Press the bias facing to the inside of the garment rolling the seam to the inside as well.

Fold the 1/4″ seam allowance under and press flat. I find it easiest to press the neckline on a ham during these steps since it echoes the finished curve of the neckline. Pin the bias facing in place as you work around the neckline.


Step 07 | Final Pressing

Step 08 | You’re Done!


As usual, if you have any questions, comments or whatever leave a note below. This is of course one of many methods to finish a neckline with a bias facing, it just happens to be my preferred method. Hope you find it useful!
No comments:
Post a Comment