How to Print and Assemble a Pattern PDF
After you have entered in your billing information and completed your purchase, you will be redirected to yourPattern Library where you will find links to download your pattern and instruction PDFs.
If you are no redirected immediately, simply click:
Your Username (top right corner) > My Account > Pattern Library
Your Username (top right corner) > My Account > Pattern Library
Once you have downloaded your pattern
Open your pattern PDF with the latest version of Adobe Reader.
Print on 8½ x 11" or A4 sized paper. It is very important not to scale or fit any of the pages. You must print the document in actual size. Your pattern will print on multiple pages, which you will then tile together.
Depending on your pattern, the number of pages will vary. Some smaller patters are only 6 pages and larger ones can be upwards of 40! But don't worry, these pages are easily tiled together to assemble your pattern.
Printing your pattern
Find the page in your pattern tat contains the Test Square.

You may want to locate, print, and test this page beforeprinting the whole pattern. Just scroll through the pattern PDF until you see the test square and notice what page number it is on. Then in printing options under "Pages", indicate the page page number you want to print. Measure the sides of the test square with a ruler, each side should be 10cm or 4" (actual length is 3 15⁄16"). Doing this will help ensure that the pattern will be printed at the proper scale.
Tiling your pattern together

You will notice that the edges of your pages have numbers, letters, and triangles.
Simply match together 1a with 1a, 1b with 1b, 2a with 2a, etc.
We suggest laying out all your pages on a large flat surface to match all the triangles together.
Now, simply tape the pattern pages together:


First, cut or fold one of the sides and match the edge to its corresponding side (e.g. 1a to 1a). Then, tape it down in place so the paper is secure.

We suggest taping each row together from left to right.
Then, tape the long rows together top to bottom.

Once all the sheets of paper are taped together you will have your pattern layout.
You will then either trace the pattern pieces onto a new sheet of paper, or cut out the pattern pieces following your size line.
Before you cut the pieces out you should add seam allowance if it is not already included in the pattern (burda style magazine patterns require you to add your own).

Here is a diagram showing an example a pattern with a size range of 34-44.
The principle is the same or all patterns, but the sizes vary. When in doubt, the inner most line is the smallest size and the outer most line is the largest size.
To determine your size please refer to our size chart.


- Rating
- Difficulty
- Novice
- Size
- 104, 110, 116, 122, 128 See Sizing Chart
- Type help
- Print at Home PDF
Description
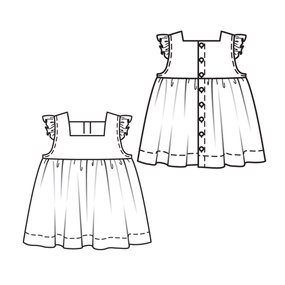
Tunic top with frilly sleeves for girls
burda style magazine patterns FAQ
burda style magazine patterns FAQ
Recommended Materials
Blouse fabrics
Amount of Fabrics
140 cm (57 in) wide striped fabric: 0.85 – 0.90 – 0.95 – 0.95 – 1.00 m (1 – 1 – 11/8 – 11/8 – 11/8 yds). 8 buttons.
Seam Allowance
This pattern doesn't include seam allowance
No comments:
Post a Comment