Monday, April 14, 2014

Baby Crib Skirt (a very basic one)

Baby Crib Skirt (a very basic one)

Okay, I’m finally kicking it into gear and finishing up Chloe’s nursery.  If you’ve missed the other parts of her room, you can find them here:

baby crib skirt


I hinted last week that I was working on her Crib Skirt.  You know, to not only add a little color and detail to Chloe’s room…..but to also hide all sorts of junk underneath. :)

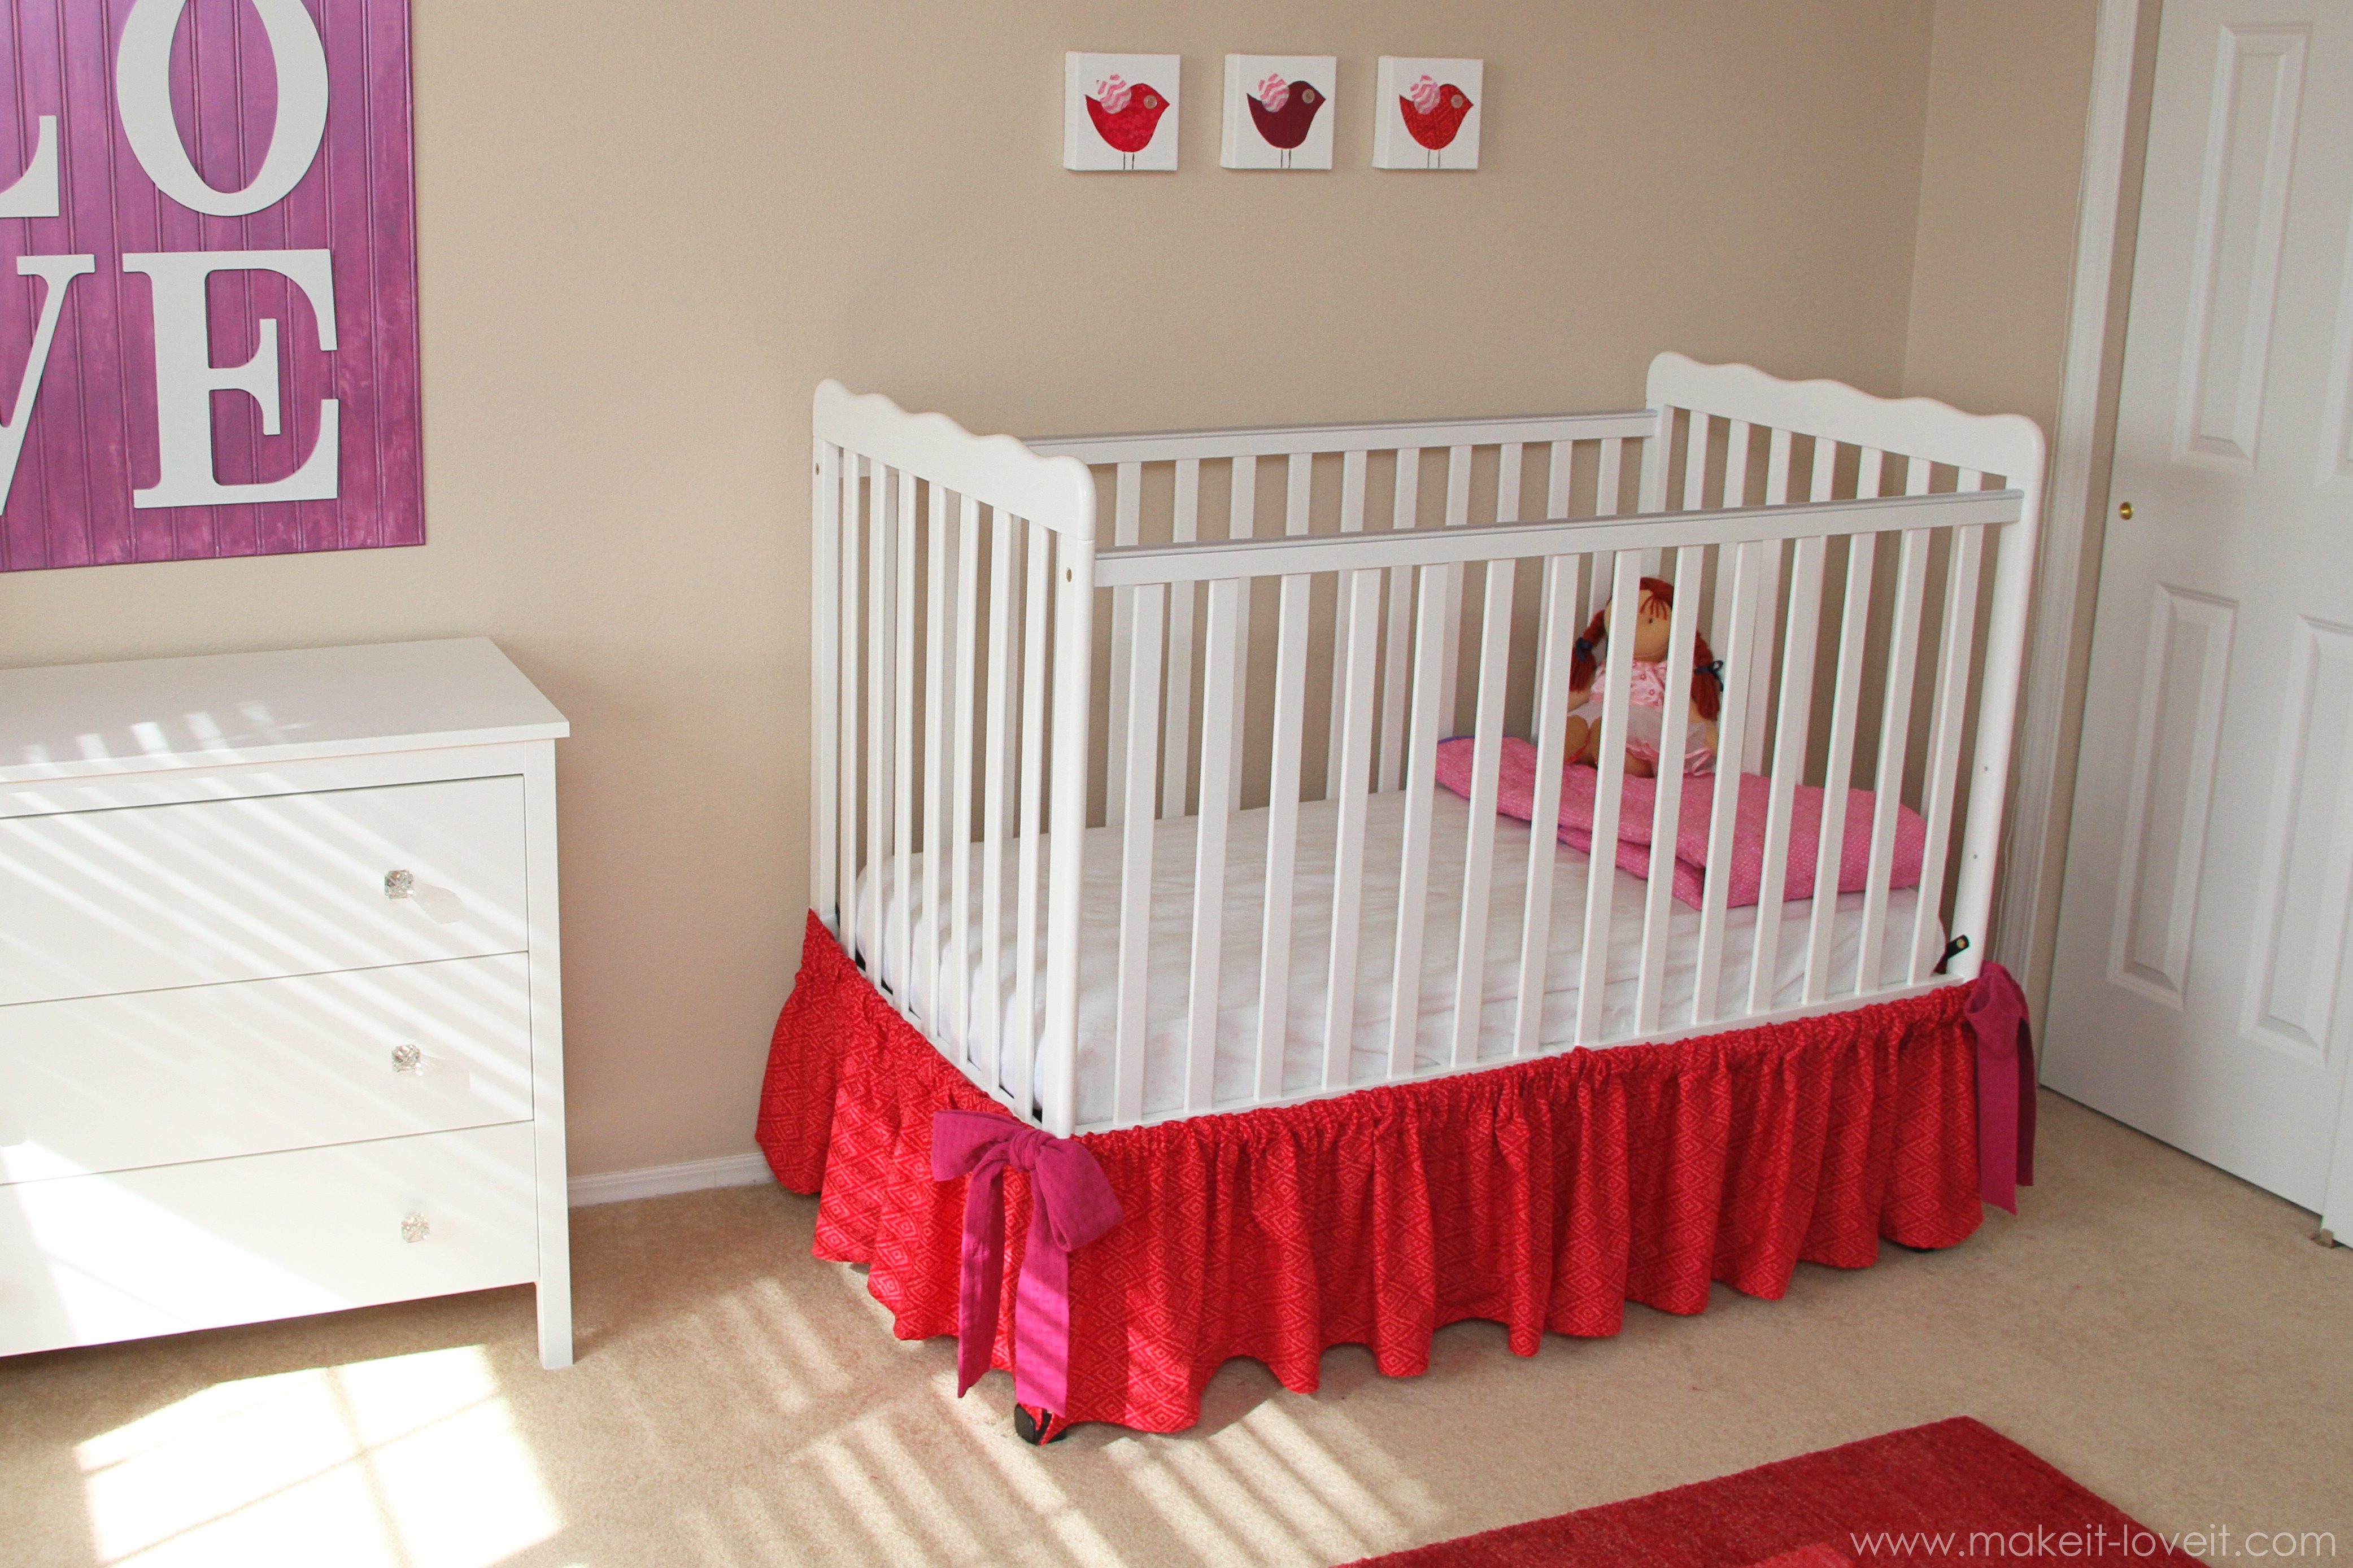
And here it is:


It’s a very simple, non-fussy skirt…….but gathers in nicely and finished off her little crib.


It’s actually just straight un-gathered panels of fabric that are pulled in along these chunky ties, creating a gathered look.  So no special skills or extra gathering/ruffling steps.  Only straight lines and ironing.
 **You could easily made this more masculine (for those baby boy cribs) and just create smaller panels of fabric that don’t need to be gathered in.


The two front corners are cinched in and tied together.  But to keep the center front from sagging, I made the front section into two section and then wrapped a little velcro around the tie at the center front, to hold it up a little better.  Once you gather up the fabric…..you’ll never see the opening between the two panels.


And if your corners are sagging, you can always add more velcro wraps at the corners.  (More on that below.)


It turned out to be just what Chloe’s crib needed. Hooray…..glad it’s finally done! :)


Would you like to make your own Baby Crib Skirt?

**These directions are made for a crib skirt that’s 14.5 inches tall.  Adjust accordingly.**
****And if you don’t care for the ruffled look (for a boy crib??), just create straight panels, that are just the right length and don’t need to be gathered in.

I made my crib skirt by using 4 equal rectangles.  1 for each side and 2 for the front.  The length of a crib is about double it’s depth, so it works out perfectly and keeps the gathering uniform.  So, cut out 4 equal rectangles that are 18.5 inches tall and 50 inches wide.

Now, start with one of your rectangles and finish off the sides first by folding over a 1/2 inch, another 1/2 inch, and then sew in place.  Then do the same thing to the bottom edge.  Iron everything flat.

Here’s a close-up.

Repeat with the other 3 rectangles pieces.

Now, create some long ties that will be threaded along the top of each crib skirt.  You can make yours much thinner or make it wider than me……but I made mine about 2.5 inches wide.  To do so, I cut out strips of fabric that were 6 inches wide.  The length for the two strips that you’ll be using for the side skirts were about 60 inches long.  And the long strip for the front was about 100 inches long.  You’ll probably have to sew some fabric together to make strips long enough.  Then turn them into tube, turn right side out, and press. (Need help with turning a tube?)
 

Now, you’ll need to make the casing along the top of each bed skirt panel, for the ties to be threaded through.  Grab one of your rectangles and fold over the top edge a 1/2 inch and iron flat.  Then, fold it over again 2.5 inches and iron again.  Then sew a seam right along the very bottom edge, near the fold. Repeat with the other 3 panels.
 

Then, grab one of the rectangles and one of the SHORTER ties and thread it through.  Once it reaches the other end, only pull it out a 1/2 inch or so, and sew the tie down in place on the one end.
 

Here’s a closer look.  Then trim off that extra fabric edge. 
 
**Do the same thing with another one of the rectangles and the other shorter tie.  But be sure that you pull the tie through the top casing starting at the other end and sew it down at the opposite end as the first one.  Because these two side panels go on opposite sides of the crib and mirror each other.

Now, on each of those two panels where you just sewed down one end of your strips and then trimmed it off…….you’ll add a strip of velcro.  This will allow you to secure one end to the crib.  Cut a strip of the fuzzy side of velcro that’s long enough to go around your crib bar.  Then cut another smaller scratchy piece of velcro.  Place the long piece face down and the scratchy piece face up.  Sew them down to the end of the panel (that has the tie sewn down).
 

Here’s a closer look.  The smaller scratchy piece is face up, the fuzzy longer piece is facing down. 
 

That way, when you wrap it around one of the bars of the crib, it will loop around and secure itself onto the scratchy velcro piece.  Repeat with the other side panel.
 

Now, attach each velcro end to the far side of each crib side. 

Now, for the other two panels that go on the front of the crib.  Grab your other 2 panels and thread your long tie through them both.


Now, the reason I made this front panel in two pieces, was so that I could easily secure the very center of the panel to the crib……so I didn’t sag in the middle.  So, I cut some thinner velcro that I could wrap it around the tie in the center, and secure it to the crib.  The concept is similar to the velcro above except it’s not going to be sewn to the fabric.  (In fact, you could use ribbon or string and just tie the panel in place at the center.  However, I just liked the idea of making removal and adjustments easier with the velcro.) 

So, I cut a long piece of velcro (this time it was the scratchy side….but it doesn’t matter) and then cut a shorter piece of the soft side of veclro and sewed them back to back.


So that it could loop around and secure onto itself.
 

And then, I wrapped it around the tie (between the two panels) and the crib, right at the center of the crib.
 

Now, slide each panel of fabric along the ties, gathering the fabric up a bit.  Then grab a tie from one of the sides and one of the front ties…….and tie them together into a big floppy bow.  Do the same to the other corner.  Adjust the gathers, keeping the spacing even and pull the fabric downward, to help keep the look uniform.  (However, before I got too fussy about the spacing of everything, I trimmed my ties to the length that I wanted, and hemmed them by folding each end under a 1/4 inch, another 1/4 inch, then sew in place.  I just wasn’t sure exactly how long I wanted them until I had the crib skirt in place.  But then I put them back up and evenly spaced the gathers.)
 

 And remember, if your corners are sagging, add a few more velcro wraps to the corners.  That will hold it up nicely.

Enjoy!
-Ashley

{Curtain Solution}

{Curtain Solution}


I am SUPER excited to share this little tutorial with you today! 
I have shared this trick with a number of friends over the years, I hope you love it as much as they have.

First things first... Supplies!!!
~A wire hanger or long stick with hook

~Ribbon or thick string
(I always like to use ribbon that matches closely with the curtain I am working with) 

~scissors

AND PATIENCE! :)

OK, here's an example of a typical curtain. 
When I first started my journey of decorating it would DRIVE me CRAZY that one side of my curtain would gather and the other side looked flat and lifeless! ughh!! 
So I came up with this easy solution. 
It might be somewhat simpleton, but it works for me.


BEFORE

AFTER


{Step #1}
Take your curtain panel and lay it on its backside


{Step #2}
Find an old wire hanger or long stick with a hook, Anything that you can attach your  ribbon or string to.  

(In the Picture I have used a wired hanger that I straightened. I attached ribbon and left the hook  at the end
so the ribbon wouldn't slide off)


{Step #3}
Thread the ribbon through the open tab
(Tip...make sure you have plenty of extra ribbon on BOTH sides)


{Step #4} 
Tie the ends of the ribbon together 


{Step #5} 
It's finally time to add the rod. 
Keep the ribbon tied together when you are doing this. 
(It might be a tight squeeze!)

{Step #6}
Voila...hang your curtain rod and you're done!! 
I love this little trick because you never have to fuss with your curtains ever again! 
They stay PERFECTLY gathered all the time. 

 Just one more thing that makes life a little easier! :)


Velcro Burlap Bed skirt

Velcro Burlap Bed skirt

March 21, 2010 AT 10:49 pm 62 Comments
I am continuing to work on my master bedroom makeover.
I found an entertainment armoire to hide our tv in for $40.oo! It needs a little work and a fresh coat of paint, but I think it will look great when I am finished. :)
A little progress has been made on my bedding. This part can be stressful. I am trying to come up with the colors that I want in my bedroom. I was leaning toward my favorite colors…tan, black, white, and red. But lately, I’ve been wanting to add a little bit of light blue instead of red to my palette.
I went to some fabric stores and found a fabric that I loved. It had some blues and browns in it, and I might make some pillows with it. Not sure.
IMG_5936
But I did decide what material to use for my bed skirt.
Brown burlap.
IMG_5900
Ya’ll know that I love burlap. And when I was looking at my inspiration fabric, I could picture it with a brown bed skirt. I remembered that Hobby Lobby had some brown burlap on sale for $1.99 a yard. How can you beat that?
I bought four yards of it and brought it home. I tucked it under my mattress to get an idea of what it would look like and I loved it!
So here is what I did to make it.
The burlap comes in a 45 inch width, so I unfolded the material and cut it in half. I will be able to make skirts for two sides of my bed with this.
IMG_5901
Using one half of the material, I decided to make my hem on the outer un-cut edge by first ironing the edge over about a half inch.
IMG_5905
Then I folded it over again about an inch and pressed it again
IMG_5907IMG_5906
Next I sewed a straight stitch down the hem.
IMG_5909
Now I have to explain this great idea I had for making a bed skirt.
I wanted to make a skirt that I could just velcro onto my box springs. I have made bed skirts before that are like the kind you buy in the store. The ones that have the material all the way across the box springs that the skirt is attached to.
It was always really hard for me to get the bed skirt to fit “just right”. One side was usually too long, and I would have to use safety pins to keep the skirt in place. Even bed skirts you purchase in stores can drive you nuts. They are always moving around when you put your fitted sheet on, or they will end up sliding over and drooping on one side. I can’t stand that.
So to keep my bed skirt in place, I decided to velcro it to my box springs. I didn’t come up with this idea on my own. My mom was a professional seamstress, and she had told me about this idea. She hadn’t tried it herself, but she said she had seen other professionals do it.
I have always wanted to try it, and my bedroom makeover was the perfect place.
So I bought some industrial strength velcro from Walmart for twenty dollars. I didn’t like paying that much, but it was a lot cheaper than the velcro I almost bought at JoAnn’s Fabrics. It would have been over 40 dollars there!
I got it because it was two inches wide, and I thought that it would make the bed skirt more durable. (You may be able to find it somewhere else for less.)
IMG_5938
Unfortunately, I didn’t notice that it had a “sticky” back to it. (I know…it says it right on the box! Duh.) The stickiness actually became a huge pain when I was sewing the material to it.
Now you might think I am crazy, but I hot glued the velcro to my box springs. I wanted to make sure it wasn’t going anywhere. :)
IMG_5922
The velcro strip looked something like this when I was done. (I have pushed my mattress back to take this picture.)
IMG_5911
The edge of the velcro was 17 inches from the ground so I decided to make the skirt 18 inches long.
IMG_5912
The next steps are not easy to describe in a post, but I will try.
The total length of my material from top to bottom was about 22 inches long (after I had already hemmed the bottom). I wanted the skirt to be a finished length of 20 inches…18 inches for the part of the skirt you would see, and 2 inches to sew onto the velcro strip
and tuck under the mattress.
I also created a one inch hem on each side of the skirt.
IMG_5916
The next part made me almost lose my sanity!!!
I was going to show you an easy way to pin the material to the velcro strip, but there was no EASY to it! The material kept sticking to the strip when I didn’t want it to. (I’m not going to go into detail of how I literally wrestled that strip of sticky velcro…it’s just too painful to re-live.)
IMG_5917
I finally decided to use the “stinky” to my advantage.
I just folded the material over every couple of inches and pressed it to the “sticky”.
IMG_5919
It still wasn’t holding together very well, so I ran to my sewing machine and began sewing.
I sewed a straight stitch on the top and bottom of the two inch velcro strip and attached it to the box springs.
IMG_5941

Though I wasn’t sure it was all going to come together…
it turned out exactly as I had hoped.
(I still need to iron it in a few spots.)
IMG_5923
I ADORE the look of burlap.
IMG_5928 IMG_5933
I only have pictures of the left side of my bed because I haven’t done the other sides yet. :)
IMG_5930
I used a little less than four yards for this side of the bed. I had to cut off about 6 inches of one end because there was a bad place in the burlap. Sometimes that happens.
IMG_5934
The other half of this material will be used for the skirt at the end of the bed. I will need to get 4 more yards to do the right side of the bed and will have material left over for pillows if I need it. ;) I will have 8 total yards in the whole bed skirt which will cost me $16.00. So the whole skirt ended up costing me $36.00. I think that’s pretty good! (I already had the other supplies like thread and glue sticks.)
I am hoping to finish the skirt tomorrow, and start painting the armoire.
Update:  Here is a picture of my bedskirt in my completed bedroom makeover.

If you have any questions about my bed skirt, please feel free to ask. It’s usually best to email me at
beneathmyheart4(at)gmail(dot)com
And don’t forget about my first linky party! You ALL are invited!
marchlargebutton
You can read about the details by clicking on the button.
If you would like to help me spread the word about my party, you can add my button to your sidebar or in a post. (You’ll be my BFF in you do!) :)

Household project #2 - done and dusted - bed skirt

January 17, 2012

Quick-and-Easy Bed Skirt

http://www.hgtv.com/hgtv/bedrooms/article/0,1001254,HGTV_42788_6034776,00.html

Quick-and-Easy Bed Skirt

A great project for beginning sewers, a custom bed skirt will boost your bedroom's style.
Erinn Valencich, ErinnV.com

Materials Needed:

  • tape measure
  • pins
  • fabric (approximately 3 yards for a queen and 6 yards for a king)
  • sewing machine
  • thread
  • iron
  • scissors
  • pins

Measure Bed

Measure the space between the floor and the bottom of the mattress — this is referred to as the drop. Add this measurement to 4 inches for the hem plus 3 to 5 inches to tuck under the mattress. To determine the length of each fabric panel (the bed skirt will consist of three panels: two sides plus the foot of the bed), measure the mattress itself. On average, a queen is approximately 60x80 inches and a king is approximately 76x80 inches.

Cut Fabric

Cut fabric to needed dimensions; add 6 inches to each panel's length for seams.

Iron Fabric

Iron fabric so seams are straight when sewing. The bottom hem will be 4 inches and the top hem will be 1/2-inch. Fold over approximately 4 inches on long side of each piece for the hem and iron this fold. Fold over approximately 1/2-inch on short side of each piece for the hem and iron this fold.

Sew Together

Sew hems and seams using a sewing machine.

Secure Bed Skirt

Using straight pins, secure the bed skirt to top of box springs, making sure the bed skirt hangs evenly on all sides.